golang slice 增长公式
当切片容量不足时,会调用Go标准库 runtime.growslice 函数为切片扩容
这里只关注增长公式
第一步 确定容量
go 1.18 之前
func growslice(et *_type, old slice, cap int) slice {
  ......

  newcap := old.cap
	doublecap := newcap + newcap
	if cap > doublecap {
		newcap = cap
	} else {
		if old.cap < 1024 {
			newcap = doublecap
		} else {
			// Check 0 < newcap 检测溢出并防止无限循环
			for 0 < newcap && newcap < cap {
				newcap += newcap / 4
			}
			if newcap <= 0 {
				newcap = cap
			}
		}
	}

  ......
}
在这里可以得出
若申请的容量为原来容量的两倍以上, 则直接确定新容量为申请的容量, 否则
在容量小于1024之前增长因子为2, 即容量翻倍
容量大于1024之后增长因子为1.25, 即容量增加25%, 直到大于申请的容量
go 1.18之后
func growslice(et *_type, old slice, cap int) slice {
  ......

  newcap := old.cap
	doublecap := newcap + newcap
	if cap > doublecap {
		newcap = cap
	} else {
		const threshold = 256
		if old.cap < threshold {
			newcap = doublecap
		} else {
			for 0 < newcap && newcap < cap {
				newcap += (newcap + 3*threshold) / 4
			}
			if newcap <= 0 {
				newcap = cap
			}
		}
	}

  ......
}
阈值变小了, 为了让小切片到大切片的增长因子有平滑的过度进行了改进(commit)
在容量小于256之前增长因子为2, 即容量翻倍, 与之前相同
在容量大于256之后, 公式等于 新容量 = 旧容量 + (旧容量 + 3 * 256) / 4
等于 新容量 = 1.25 * 旧容量 + 192
因此当容量大于256时, 增长因子为1.25, 加上固定容量192
随着容量增长, 增长因子因此逐渐靠近1.25
starting cap    growth factor
256             2.0
512             1.63
1024            1.44
2048            1.35
4096            1.30
第二步 内存对齐
代码紧接上一步
func growslice(et *_type, old slice, cap int) slice {
  ......

	var overflow bool
	var lenmem, newlenmem, capmem uintptr
	switch {
	case et.size == 1:
		lenmem = uintptr(old.len)
		newlenmem = uintptr(cap)
		capmem = roundupsize(uintptr(newcap))
		overflow = uintptr(newcap) > maxAlloc
		newcap = int(capmem)
	case et.size == goarch.PtrSize:
		lenmem = uintptr(old.len) * goarch.PtrSize
		newlenmem = uintptr(cap) * goarch.PtrSize
		capmem = roundupsize(uintptr(newcap) * goarch.PtrSize)
		overflow = uintptr(newcap) > maxAlloc/goarch.PtrSize
		newcap = int(capmem / goarch.PtrSize)
	case isPowerOfTwo(et.size):
		var shift uintptr
		if goarch.PtrSize == 8 {
			shift = uintptr(sys.Ctz64(uint64(et.size))) & 63
		} else {
			shift = uintptr(sys.Ctz32(uint32(et.size))) & 31
		}
		lenmem = uintptr(old.len) << shift
		newlenmem = uintptr(cap) << shift
		capmem = roundupsize(uintptr(newcap) << shift)
		overflow = uintptr(newcap) > (maxAlloc >> shift)
		newcap = int(capmem >> shift)
	default:
		lenmem = uintptr(old.len) * et.size
		newlenmem = uintptr(cap) * et.size
		capmem, overflow = math.MulUintptr(et.size, uintptr(newcap))
		capmem = roundupsize(capmem)
		newcap = int(capmem / et.size)
	}

  ......
}
由于本文主要关注增长相关问题, 所以这里忽略其他
这部分主要使用使用 roundupsize 函数处理内存对齐
最终可能导致newcap变大
示例
func main() {
	// 运行于 go 1.19.2
	s1 := []uint8{1, 2, 3}
	fmt.Printf("s1 len:%d, cap: %d \n", len(s1), cap(s1))
	// 3 + 4 大于两倍, 直接使用 7
	// 内存对齐 8
	s1 = append(s1, 4, 5, 6, 7)
	fmt.Printf("s1 len:%d, cap: %d \n", len(s1), cap(s1))

	s2 := make([]int, 256)
	fmt.Printf("s2 len:%d, cap: %d \n", len(s2), cap(s2))
	//   256 + (256 + 3 * 256) / 4
	// = 512
	s2 = append(s2, 1, 2, 3, 4)
	fmt.Printf("s2 len:%d, cap: %d \n", len(s2), cap(s2))
}
输出
s1 len:3, cap: 3
s1 len:7, cap: 8
s2 len:256, cap: 256
s2 len:260, cap: 512
总结
由此可以看出所有决定容量的步骤
- 当申请容量大于当前容量两倍则直接使用申请容量
- 当容量小于容量阈值, 增长因子为2, 即容量翻倍
- go 1.18 之前, 当容量大于容量阈值, 增长因子为1.25, 即容量增加 25%, 直到满足申请容量
- go 1.18 和之后, 在容量增加 25% 之外还额外增加固定 192
- 进行内存对齐
容量阈值
go 1.18之前为1024
容量阈值go 1.18和之后为256, 编辑日期2022年11月7日
Gin 中的 next
func main() {
	r := gin.Default()
	r.Use(func(c *gin.Context) {
		fmt.Println(1, " ")
		c.Next()
		fmt.Println(6, " ")
	})
	r.Use(func(c *gin.Context) {
		fmt.Println(2, " ")
		fmt.Println(5, " ")
	})
	r.Use(func(c *gin.Context) {
		fmt.Println(3, " ")
		c.Next()
		fmt.Println(4, " ")
	})
	r.GET("/ping", func(c *gin.Context) {
		c.JSON(http.StatusOK, gin.H{
			"message": "pong",
		})
	})
	r.Run("localhost:8080")
}
// 打印 1 2 5 3 4 6
Gin 中使用 gin.go Use 函数注册中间件
最终调用 routergroup.go Use 函数, 放入 group.Handlers 队列中
func (engine *Engine) Use(middleware ...HandlerFunc) IRoutes {
	engine.RouterGroup.Use(middleware...)
	engine.rebuild404Handlers()
	engine.rebuild405Handlers()
	return engine
}

func (group *RouterGroup) Use(middleware ...HandlerFunc) IRoutes {
	group.Handlers = append(group.Handlers, middleware...)
	return group.returnObj()
}
func (c *Context) Next() {
	c.index++
	for c.index < int8(len(c.handlers)) {
		c.handlers[c.index](c)
		c.index++
	}
}
在 Next 函数中可以看到, 通过控制 index 来控制中间件的结束
并且默认在执行完上一个中间件之后, 即使不调用 Next 也会继续调用下一个中间件
const abortIndex int8 = math.MaxInt8 >> 1

func (c *Context) Abort() {
	c.index = abortIndex
}
在注册中间件时, 有个数量判断, 数量必须小于 abortIndex
所以在 Gin 里中断剩余中间件的方法 Abort 函数的实现是对 index 赋值
总结
- 中间件代码无论是否有调用 Next() 方法,后续中间件也会执行
- 中间件调用 Next() 方法之后, 会先执行后面的中间件最后再执行当前中间件的剩余代码
- 中断剩余中间件需要使用 Abort() 方法, 但当前中间件的剩余代码以及调用了 Next() 的中间件的剩余代码还会继续执行
Koa 中的 next
const Koa = require('koa');
const app = new Koa();

app.use(async (ctx, next) => {
  console.log(1);
  await next();
  console.log(6);
})

app.use(async (ctx, next) => {
  console.log(2);
  await next();
  console.log(5);
})

app.use(async (ctx, next) => {
  console.log(3);
  await next();
  console.log(4);
})

app.use(ctx => {
  ctx.body = 'Hello Koa';
});

app.listen(3000);
// 输出 1 2 3 4 5 6
Koa 中使用 use 函数注册中间件, 并按照注册注册顺序调用
在 application.js use 函数中可以看到, 传入的中间件被放入了一个 middleware 队列中
use (fn) {
  ...
  this.middleware.push(fn)
  ...
}
在 application.js callback 函数中使用 koa-compose 来处理 middleware 队列
callback () {
    const fn = this.compose(this.middleware)
    ...
  }
接下来看看 compose 函数
// 省略了一些错误判断
function compose (middleware) {
  return function (context, next) {
    return dispatch(0)
    function dispatch (i) {
      let fn = middleware[i]
      if (i === middleware.length) fn = next
      if (!fn) return Promise.resolve()
      try {
        return Promise.resolve(fn(context, dispatch.bind(null, i + 1)));
      } catch (err) {
        return Promise.reject(err)
      }
    }
  }
}
从上面的函数可以看出, next 函数是由 dispatch.bind(null, i + 1) 这句语句生成的
使用 next 则调用下一个中间件, 若不使用 next 则执行完当前中间件就会返回
并且在调用完成之后还能再返回到原来的中间件(即洋葱模型)
将上面的函数拆解并精简之后, 方便理解
const middleware = [];

function use(fn) {
    middleware.push(fn);
}

function dispatch(i) {
    const fn = middleware[i];
    if (!fn) return
    return fn(dispatch.bind(null, i + 1));
}

function compose() {
    return dispatch(0);
}

use((next) => {
    console.log(1);
    next();
    console.log(6);
})
use((next) => {
    console.log(2);
    next();
    console.log(5);
})
use((next) => {
    console.log(3);
    next();
    console.log(4);
})
compose()
// 输出 1 2 3 4 5 6
总结
- 中间件代码必须调用 next() 方法, 后续中间件才会执行
- 中断剩余中间件即不调用 next() 方法
- 中间件调用 next() 方法之后, 会先执行后面的中间件最后再执行当前中间件的剩余代码
- 中间件可以是 async 函数, 因为 dispatch 函数使用了 Promise 返回
Express 中的 next
const app = require("express")()

app.use((req, res, next) => {
  console.log(1);
  next();
  console.log(6);
})

app.use((req, res, next) => {
  console.log(2);
  next();
  console.log(5);
})

app.use((req, res, next) => {
  console.log(3);
  next();
  console.log(4);
})

app.use((req, res, next) => {
  res.send('Hello Express');
});

app.listen(3000);
// 输出 1 2 3 4 5 6
注册
Express 中使用 use 函数注册中间件, 并按照注册顺序调用
注册时最终会调用 lib/router/index.js use 函数
最终会 new 一个 Layer 并放入 stack 队列中
proto.use = function use(fn) {
  ...
  var layer = new Layer(path, {
    sensitive: this.caseSensitive,
    strict: false,
    end: false
  }, fn);

  layer.route = undefined;
  this.stack.push(layer);
  ...
}
调用
在收到请求时的处理在 lib/router/index.js handle
然后在 handle 函数中定义了 next 函数
然后执行 next 函数去到 lib/router/layer.js 的 handle_request 函数或者 handle_error 函数
// lib/router/index.js handle 极度简化了代码
proto.handle = function handle(req, res, out) {
  ...
  idx = 0
  stack = this.stack

  next()

  function next(err) {
    ...
    if (idx >= stack.length) {
      return;
    }
    ...
    layer = stack[idx++]
    ...
    if (err) {
      layer.handle_error(err, req, res, next);
    } else {
      layer.handle_request(req, res, next);
    }
  }
  ...
}
Layer.prototype.handle_error = function handle_error(error, req, res, next) {
  var fn = this.handle;

  if (fn.length !== 4) {
    // not a standard error handler
    return next(error);
  }

  try {
    fn(error, req, res, next);
  } catch (err) {
    next(err);
  }
};

Layer.prototype.handle_request = function handle(req, res, next) {
  var fn = this.handle;

  if (fn.length > 3) {
    // not a standard request handler
    return next();
  }

  try {
    fn(req, res, next);
  } catch (err) {
    next(err);
  }
};
从上面的 handle 可以看出, 通过 next 的嵌套调用实现中间件的调用
即调用 next 就会调用下一个中间件, 但相比 Koa 它并不支持 Promise
并且使用 try catch 捕捉了错误, 通过 next 进行传播, 所以错误中间件必须在最后注册
简化版本
const stack = [];

function use(fn) {
    stack.push(new Layer(fn));
}

function handle() {
    let idx = 0;

    next()

    function next(err) {
        if (idx >= stack.length) {
            return;
        }
        const layer = stack[idx++]
        if (err) {
            layer.handle_error(err, next)
        } else {
            layer.handle_request(next)
        }
    }
}
function Layer(fn) {
    this.handle = fn
}
Layer.prototype.handle_error = function (err, next) {
    const fn = this.handle
    if (fn.length !== 2) return next(err) // 跳过不是错误处理的中间件
    try {
        fn(err, next)
    } catch (err) {
        next(err)
    }
}

Layer.prototype.handle_request = function (next) {
    const fn = this.handle
    if (fn.length > 1) return next() // 跳过错误处理的中间件
    try {
        fn(next)
    } catch (err) {
        next(err)
    }
}


use((next) => {
    console.log(1);
    next();
    console.log(6);
})
use((next) => {
    console.log(2);
    next();
    console.log(5);
})
use((next) => {
    console.log(3);
    next();
    console.log(4);
})
use((next) => {
    throw new Error("some err");
})
use((err, next) => {
    console.log(err.message)
})
handle()
/**
 * 输出
 * 1
 * 2
 * 3
 * some err
 * 4
 * 5
 * 6
 **/
结论
- 中间件代码中必须调用 next() 方法, 后续中间件才会执行
- 中断剩余中间件代码只要不调用 next() 方法即可
- 普通中间件参数不能大于3个, 错误处理中间件参数只能是4个, 否则将不会被调用
- 错误处理中间件必须要排在普通中间件的后面
- 中间件不支持 Promise
- 中间件调用 next() 方法之后, 会先执行后面的中间件最后再执行当前中间件的剩余代码, 即使是在中间件抛出错误时也一样
mdBook
mdBook是一个markdown文件文档生成工具, 将markdown文档转换为html格式
像Gitbook一样, 但用Rust实现
Hello World
获取mdBook, 从mdBook的Github页面下载即可
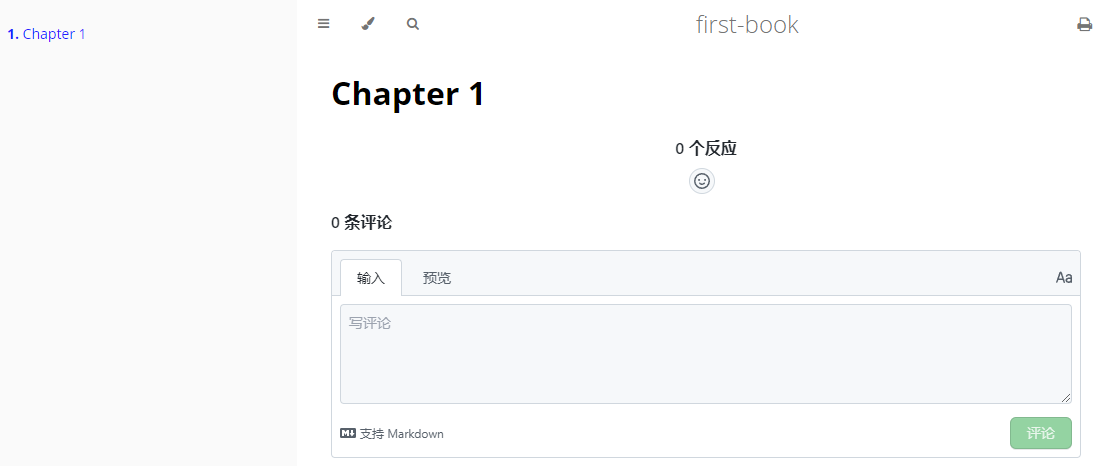
创建项目 mdbook init first-book
然后得到一个如下的文件结构
first-book
├── book.toml         项目配置文件
├─book                默认构建完的静态工程输出目录
└─src                 存放md文档的目录
    ├── SUMMARY.md    项目导航侧边栏的定义文件(文件名不能更改)
    └── chapter_1.md  mdBook生成的示例文件
构建并通过默认浏览器打开 mdbook build first-book --open
或者通过启动服务的方式mdbook serve first-book --open
启动服务会监听文件变更重新构建html文件并实时反映到网页上
GitHub Pages
GitHub Pages是Github提供的一个网页寄存服务, 于2008年推出
可以用于存放静态网页, 包括博客、项目文件、甚至整本书1
Create a repository
既然是Github提供的服务, 那第一步就是需要创建一个仓库
创建一个名为username.github.io的public仓库
Hello World
git clone https://github.com/username/username.github.io
cd username.github.io
echo "Hello World" > index.html (linux 指令)
"Hello World" | Out-File index.html (windows powershell 指令)
git add --all
git commit -m "Hello World"
git push -u origin main
完成后使用浏览器打开https://username.github.io2
更改构建分支/文件夹
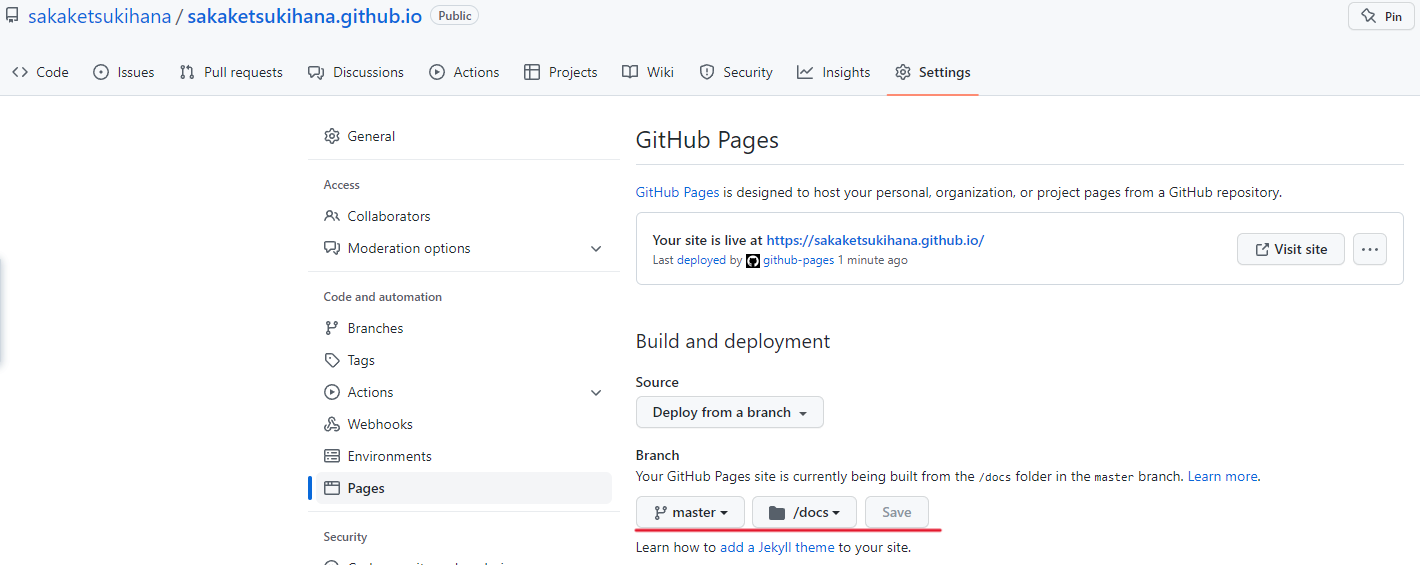
若想要更改构建的分支或者文件夹
通过Github仓库页面, 选择Settings
然后从左边导航栏中选中Pages
通过Branch修改, Save后启用
Giscus
由GitHub Discussions驱动的评论系统
获取Giscus配置
整合
为mdBook启用Giscus
假设使用的是
username.github.io来作为Giscus配置仓库
在first-boo目录下新增一个js文件
var giscus = function () {
  const script = document.createElement("script");
  script.type = "text/javascript";
  script.src = "https://giscus.app/client.js";


  script.setAttribute("data-repo", "username/username.github.io");
  script.setAttribute("data-repo-id", "data-repo-id");
  script.setAttribute("data-category", "data-category");
  script.setAttribute("data-category-id", "data-category-id");

  script.setAttribute("data-mapping", "title");
  script.setAttribute("data-term", "0");
  script.setAttribute("data-reactions-enabled", "1");
  script.setAttribute("data-emit-metadata", "0");
  script.setAttribute("data-input-position", "top");
  script.setAttribute("data-theme", "preferred_color_scheme");
  script.setAttribute("data-lang", "zh-CN");
  script.setAttribute("data-loading", "lazy");

  script.crossOrigin = "anonymous";
  script.async = true;
  document.getElementById("giscus-container").appendChild(script);
};

window.addEventListener('load', giscus);
下载mdBook的handlebars模板
cd username.github.io
mkdir theme
cd theme
wget https://raw.githubusercontent.com/rust-lang/mdBook/master/src/theme/index.hbs -o index.hbs
修改index.hbs模板
......
<main>
    {{{ content }}}
    <div id="giscus-container"></div> // 新增 giscus 元素
    // 不能使用 giscus 作为ID, 不然会覆盖到自身本来的
</main>
......
修改book.toml增加指定加载新增的js文件, 假设js文件名为giscus
......
[output.html]
additional-js = ["giscus.js"]
......
最后构建静态文件并将文件提交到username.github.io仓库
mdbook build first-book
好了, 打开https://username.github.io
共用仓库
如果你想将md文件与静态文件放在同个仓库
可以这样修改book.toml的构建输出文件夹
......
[build]
build-dir = "docs"
......
并将Github Pages中构建的文件夹更改为docs
Protocol Buffer
Protocol Buffer, 简称 ProtoBuf
由 Google 开发,是一种开源跨平台的序列化协议
Proto2 Diff Proto3
Proto3是Proto2的简化版本
默认值
Proto3不允许自定义默认值, 在Proto3中的所有字段都具有一致的零默认值
必填字段
Proto3删除了required字段的支持
编码
varints
可变宽整数, 使用 1 到 10个字节之间的长度对无符号64位整数进行编码,较小的值可以使用较少的字节
在varint中,每个字节都有一个标志位,表示它后面的字节是否时varint的一部分
这个字节是MSB(Most Significant Bit / 最高有效位), 低 7 位是有效载荷
0000 0001
^ msb

1000 0011 0000 0001 // 131
^ msb     ^ msb
那么是如何得出是 131 的呢
1000 0011 0000 0001 // 原始输入
 000 0011  000 0001 // 去除MSB
 000 0001  000 0011 // 按小端排列
 10000011           // 连接
 128 + 2 + 1 = 131  // 解释为十进制
字段编号和类型
当对消息进行编码时,每个键值对会变为一个记录
其中包含字段编号(field number 简称 fn)、类型(wire type 简称 wt)和有效负载
其中字段编号和类型 使用 varint 格式编码, 最低三位表示类型
| Wire Type | 解析 | 对应数据类型 |
|---|---|---|
| 0 | varint 变长整型 | int32, int64, uint32, uint64, sint32, sint64, bool, enum |
| 1 | 固定8字节 | fixed64, sfixed64, double |
| 2 | 后面需要跟随一个长度 | string, bytes, required字段, 嵌套类型 |
| 3 | 废弃 | |
| 4 | 废弃 | |
| 5 | 固定4字节 | fixed32, sfixed32, float |
// 消息定义
message example {
  int32 i32 = 1;
  fixed64 f64 = 2;
  string str = 3;
  sint32 s32 = 4;
}

// 假设序列化时的对象信息
{
  i32: 257,
  f64: 1,
  s32: -2,
  b: Buffer.from([0xaa, 0xbb, 0xcc, 0xdd]),
}
//编码后 <Buffer 08 81 02 11 01 00 00 00 00 00 00 00 1a 04 aa bb cc dd 20 03>
首先分析第一个字节 0x08 二进制 0000 1000
去除MSB, 000 1000
后三位表示类型 wt = 000 = 0, 表示数据类型为变长整形
剩余字段表示字段编号 fn = 0001 = 1
第二个字节 0x81 => 1000 0001
MSB为1, 表示后面的数据是其的一部分
第三字节 0x02 => 0000 0010
MSB为0, 表示是数据最后一个字节
按照小端排列并连接起来得到
000 0010 000 0001 => 257
即前三个字节表示, 字段编号1, 数据类型为变长整形
对应到消息定义的类型为int32, 对应数据为 257
接着分析第四个字节 0x11 => 0001 0001
fn = 2, wt = 1
即有效载荷为 01 00 00 00 00 00 00 00
根据小端排序后 00 00 00 00 00 00 00 01
对应到消息定义的类型为fixed64, 对应数据为 1
接着分析第十三个字节 0x1a => 0001 1010
fn = 3, wt = 2
当 wt = 2 时, 后面紧跟一个 varint 编码的数值表示有效载荷的长度
第十四字节 0x04 , 表示后面的有效载荷的长度为4, 为 0xaa, 0xbb, 0xcc, 0xdd
接着分析第十九个字节 0x20 => 0010 0000
fn = 4, wt = 0
第二十个字节为 0x03 => 0000 0011
对应到消息定义的类型为s32, sintN使用了ZigZag编码,而不是二进制补码的来编码负整数
总结
- 当小负数时应该选择 sint32, sint64 相比 int32 和 int64 在负数时更具效率, 因为使用了 ZigZag 编码
- 当数字大于 2^56 那么定长8字节的 fixed64 比 uint64 更高效, 因为 uint64 每个字节只有7位有效负荷
- 当数字大于 2^28 那么定长4字节的 fixed32 比 uint32 更高效, 原因一样
参考资料
ZigZag
ZigZag是一种压缩算法, 可以对小负数进行有效的压缩
在了解算法前, 首先需要知道计算机使用补码存储数据
- 原码: 最高位位符号位, 剩下的表示绝对值
- 反码: 除了符号位外, 对原码剩下的位取反
- 补码: 对于正数和零补码就是其原码, 对于负数的补码则是其反码+1
由于计算机使用补码存储数据, 二进制数据非常大, 在普通的去零压缩中没有优势
ZigZag是将符号位移动到最低位, 若是负数则再对除符号位之外数据位取反
相当于原码, 只是符号位在最低位
// 编码过程
-2                                  // 十进制
10000000 00000000 00000000 00000010 // 原码
11111111 11111111 11111111 11111110 // 补码
// ZigZag
-2 << 1 // 数据整体往左移动一位, 低位补0
11111111 11111111 11111111 11111100
-2 >> 31 // 将符号位移动到最低位, 由于是负数所以高位补1
11111111 11111111 11111111 11111111
(-2 << 1) ^ (-2 >> 31)  // 相当于返回了原码,只是将符号位放置在了最低位
n = 00000000 00000000 00000000 00000011

// 解码过程
n >> 1 // 右移,还原数据位
00000000 00000000 00000000 00000001
-(n & 1) // 还原符号位
00000000 00000000 00000000 00000001
(n >> 1) ^ (-(n & 1))
11111111 11111111 11111111 11111110
数据与编码对对应关系, 也是名称的由来
| 非负数 | 负数 | ZigZag |
|---|---|---|
| 0 | 0 | |
| -1 | 1 | |
| 1 | 2 | |
| -2 | 3 | |
| ... | ... | ... |
| 2,147,483,647 | 4,294,967,294 | |
| -2,147,483,648 | 4,294,967,295 |